|
Making Working Goat Equipment
Goat Agility and or Obstacle Course Equipment, Goat Travois, Wagon Shafts for your Goat Wagon, Goat Harness Ideas, Goat Toys, Goat Day Pack Pattern, Goat Costume Patterns and Ideas, Goat Coats and more to come. (some items not up yet, please check back)
MAKING A SIMPLE AND FREE INDIAN TYPE TRAVOIS
Here's an idea of something you can build for free before spending the money on a wagon or cart for your goat. A good way to start.
To make a very simple (and basically free) travois for your goats to pull.....Cut two long branches or small trees about 5'- 7' long and one about 2' and another 3' long. Using the string or rope from your goats hay bales tie the tow longer branches together in and "A" shape with the top of A crossed over in a small "X". Use the 3' piece for the cross piece in the A and add the 2' piece just below the 3' piece. You tie your load into a blanket and lash in between the two cross pieces... you now have an Indian Travois.
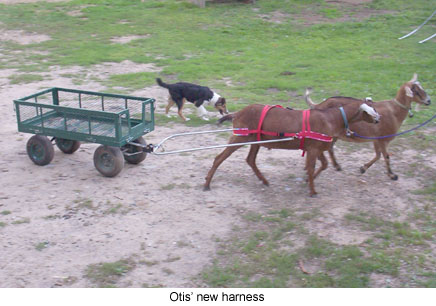
MAKING WAGON SHAFTS FOR YOUR GOAT (or dog) WAGON
Most of us can come up with a wagon for our goats to pull. I have found that for an averaged sized goat a wagon from the Hardware Store is a great buy. The ones I like are the expanded metal wagons with pneumatic wheels that has sides that come off or fold down. The bed of this type wagon is approx. 2' x 4', large and strong enough for adult to ride in comfortably (yes, a large adult). This type of wagon sells for less then $100 and is very easy to convert for goats/dogs to pull. They are built tough and will last a lifetime if well cared for.
Wagons can also be found at Garage Sales, Flea Markets, Thrift Stores and your own garage. Or ask a friend with older children and they may just give you one that their children outgrew.
Then there is the problem of shafts, you can't just buy those anywhere. You can buy them from some dog and or goat suppliers, but in my opinion the shipping alone is enough to make you shutter.
There are many ways you can make your own shafts for a goat/dog wagon. They can be made out of wood, PVC pipe, plumbing pipes, or other clever materials. I like to make ours out of 1/2" metal conduit that is 10' long. I say "I like to make", when I really mean "supervise" my husband making the shafts. LOL
The conduit shafts that I use are actually all one piece. This makes it strong and easy to store. The shafts each have a dog leash snap bolted in from the front toward the wagon at approx. 12" that the goat will be hooked into. The shaft system is easily hooked to the wagon with a 3" cotter pin. Your goat will pull forward with the shafts and the goats butt strap becomes the brake for the wagon when hooked into the wagon correctly and with not too much slack.
To make metal shafts for your wagon you will need:.
10' metal conduit
one small 1/2" plumbers T piece
one small 1/2" plumbers T that will fit into where your wagon handle come out of
connector for the two T pieces so that they fit together back to back
one 3" cotters pin
two 2" eye bolts
two nuts to fit bolts
1/2 washers with middle to fit bolts
two 3" dog leash snaps - we use brass snaps with the spring opening
Your Good Humor
something to bend the conduit with like a tree or conduit bender
two 1/2 corks or plastic chair railcovers
Electric drill
pliers
screw driver
Optional:
conduit bender or large tree to bend around 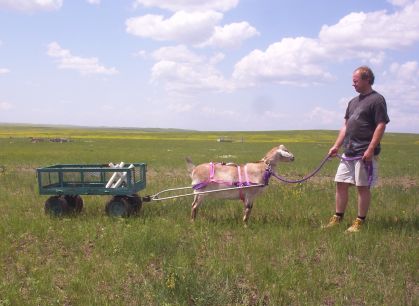
If you want the wagon to be useful for your dogs also then you will also need.
Because dogs would wear a different type of harness you need a chain in the back with two snaps.
1 - 2 foot of dog chain new or in good repair
two 3" dog leash snaps (again, we use brass with spring opening)
one small eye bolt with nut to fit it
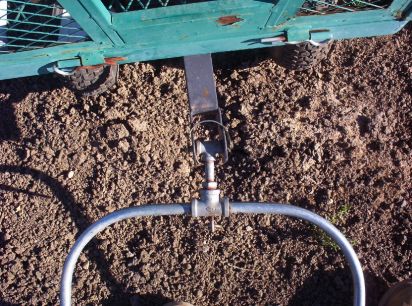
Mark the 10' metal conduit in the middle with a permanent marker then mark it approx 6" - 8" on either side of the middle mark. Slide a metal 1/2" small plumbing T unto the conduit before bending the shafts into place. Either bend the conduit with a conduit bender or wrap it around a tree. You do not have to use a fat tree, just bend one side at a time. Bend so that the shafts are even at the ends. If they do not come out quite even you can use a hack saw to "make it so".
Mark each side of your shafts in from the front (the open end) at 12" and drill a hole in the conduit so that a snap can be added in an upright position. If you have a long bodied goat or dog make your holes closer to the end so that the animal has rear leg reach. Drill the holes and place a washer on each side under the eye bolt. Fasten the nut and tighten down. Open the end of the eye bolt (just a bit) and add snap. Close eye bolt.
Your second T piece will somehow have to be connected to the first T piece. In our case we used a T connector. Because I am not sure what size second T you will need to fit your wagon I can not spell this part out for you.
The back side of the second T, or the top of the T fits into your wagon where the handle comes out and is connected to your wagon with a cotter pen. The cotter pen will make it easy for storage or travel so that you can remove the shafts quickly. We carry an extra cotter pen with us....just in case.
Place corks into or plastic covers on each end of conduit shaft. This will save your legs from gashes when training.
Now if you want this wagon to be used with dogs too.....drill the T and conduit in the center of the back part of the U in the middle. Open this eye bolt and add one of the remaining two dog leash snaps. Close eye bolt. This can ride like this with no problems while using the wagon for your goat. Now on one end of your chain add the other dog leash snap. When using the wagon for your dog add the chain to the snap that is hanging from the T. Now clip the other end of the chain with the other snap to the back of the dogs harness. The chain gives you adjustability so that different sized dogs can use the wagon correctly. NEVER use a Recreational or X-Back harness on a dog with a wagon.
If you do not convert the wagon shafts for a dog you will still need the eye bolt or bolt to hold the shafts in place on the T piece.
When you remove the handle from your wagon save it!! You never know when you might need it for something. Put your bolt and nut back into the handle so that you will know right where it is when you go for the handle. With using the cotter pen to attach your goat/dog shafts it only takes a minute for change over.
This is what has worked for us. We can not be held responsible for anyone Else's workmanship. PLEASE make sure everything is tightened down securely before adding your animals into the shafts to pull. We also can not be held responsible for your animals ability, training or safety. Nor will we be responsible for your workmanship, or lack there of, as you build your own goat equipment.
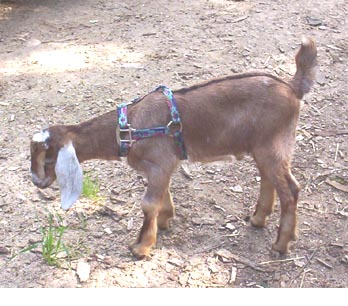
HARNESSES FOR A SMALL GOAT TO LEARN WITH
A horse halter, turned kinda sideways, with the goats body through the nose band, can become a beginner harness for a baby or small goat. Then dairy goat kid in the photo, Jacob, is wearing a pony halter.
Many goat owners either have horses or know someone with horses that will have an older halter that is in great shape hanging in the barn not being used because the color has faded (check out my craft page at www.doesmybuttlookbiginthesaddle.com to see how to recover old halters).
MAKING YOUR OWN GOAT HARNESS
If you decide to make your own Goat Harness keep in mind that the stitches MUST be very strong. Your harness is only as strong as your sewing machines weakest sewn area. I get a kick out of "webbing strength" being used to describe harnesses, it should be "stitch strength", because the area that is most likely to break on an animal harness is where it has been sewn together. You also must use a good strength thread.
You can buy nylon webbing where you can buy fabrics and craft items. But before you buy the webbing you are looking at, double it over and decide if your home sewing machine can handle and/or pull the webbing though as it stitches. Now, keep in mind that you will have areas on the harness that not only has two or three layers of the webbing but also a doubled amount of padding too. NOW?? Can your machine handle that?
You must use a heavy duty needles. Your new needles will break the thread over and over while sewing the webbing until the needle head is "broke in". I have sanded the head of the needle to stop this, but you must remember that you DO need a needle head. If you file the needle do so a little at a time.
By the time you have bought you webbing, padding, needles (get at least a four pack because you WILL break needles), buckles, slides, metal rings, thread and whatever else needed for the type of harness you will be making, you may be spending as much as you would to just buy the harness. Price everything you need before you start buying parts. If you decide to make your own harness, prepare to be frustrated.
Making a Goat Harness will take some time, probably more of your time then you think. Not trying to scare you off, really I am not, but I have met far too many people over the years that have decided to make their own dog/goat/llama/pony harnesses that these folks have just thrown or given away the stuff they bought to make their own and bought a harness professionally crafted outright.
Now, what are you using for a pattern for your harness? It is very hard to make a correct harness by looking at a photo.
Other Side of the Coin
Making your own Goat and other animal equipment is fun and rewarding. If you have the time and can sew you might just save a bunch of money making your own equipment. You will be able to pick out your favorite colors right down to the snaps. You can make the item the way YOU want it to be made. You can make it a bit bigger if you have an unusually large or make it smaller for a little bitty goat. You can make matching harnesses in bright colors for each of your goats. You can ad buttons, bows, bells, thicker padding or whatever to your item. You can also surprise a friend of yours with a nice Christmas or other Holiday gift.
GOAT COATS
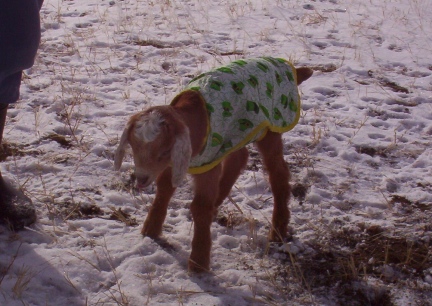
Many people like to put little coats on their baby goats in the cold weather, but where do you buy such a thing. When you do find them for sale, the price might be a bit much for something that your goat will only wear, soon outgrow, in a couple of weeks.
My suggestion is to watch for little dog coats at Garage Sales. Or discount stores sometimes have dog coats in a variety of sizes for $5, sometimes even less (look at Christmas time). You may have to adjust the style a little bit to fit a goat.
You can also look on line, do an Internet search for "free pattern dog coat" and find the patterns for sewing, knitting and crochet, for free in many sizes. Measure your goat to make sure you get the right size and shape to fit it rather then a standard dog body.
If you make a coat or sweater for your goat and the goat has horns, be sure to make the front, the chest cover, so that it opens and closes and clasps or you will not be able to put it on the goat. If you are making a sweater or coat that does not have the closure front and are adapting the pattern, add about the full length of the coat front (chest area), ie, it will wrap so that they closure is twice covering the front of the goat. You do not want the coat or sweater to just reach the front....it will be a drafty coat if you do.
Ok, you have decided on the size and the fabric you will be using. You have found a sewing pattern on the Internet. Now to make the pattern. Take an empty feed bag and cut it open on the seam. Use an inside layer of the feed bag to make your pattern. Take the paper pattern out to the goat, and with one or two or three other people helping you <grin and a wink> see if the pattern if the correct size and cut for that goat.
I suggest you make your first goat or animal coat out of an inexpensive fabric before you cut out your expensive fabrics and liners and make sure the cheaper fabric goat coat will fit your goat. Make sure that your closures will work for you, make sure it will all works well for you before ruining that expensive fabric you bought and can not wait to use.
ABOUT COATS FOR LIVESTOCK:
Does your goat really need a coat? Will the coat do more harm then good? How tight or snug dose the coat need to be? How safe is it to have a coat on your goat when you are not around? How thick should the coat be? What about the wind?
There are many things to think about before putting a coat on a goat (donkey, horse, llama or even a dog).
Size Matters! The coat or sweater that you make for the goat will need to fit the goat snugly. A baggy, or loose fitting, goat coat will catch on everything and maybe every goat that the goat passes. You do not want the coat to be tight on the goat either. A tight coat will not only be uncomfortable, but also straps may cut off circulation. A tight coat will also make movement hard for the animal.
A polar fleece, knitted, crocheted and even some other sewn fabric coats are not wind proof, so in effect you will be making the animal COLDER by adding the coat or sweater. By putting a coat (of any type) on livestock or animals you are preventing them from fluffing. Fluffing gives the animals insulation. When you squish that coat down under a coat or sweater, you take away their natural insulation.
Also, a wet sweater or fleece coat on livestock will keep then wetter longer and take away the ability for them to shake off the water. So putting a coat on an animal may or may not help them to stay warmer.
GOAT COATS FOR HUNTING SEASON

I have a page here on this site about Keeping Your Goats Safe During Hunting Season. I took a Men's Size XX and made this Vest for Hiawatha.
I am hoping to do a Video on this and add it here. But for now, I will just tell you:
I bought the Vest for $1 from a Garage Sale. I tried it on Hiawatha, and made adjustments to fit her. I cut out the zipper, and replaced it with velcro, for easy and fast off and on. Also with velcro, it would come off if she would get tangled into anything. I added a front strap at the neck, also velcro, and a Belt around the 'behind the belly' area to keep it upright. Think 'back strap' on a Horse Saddle.
GOAT COSTUMES
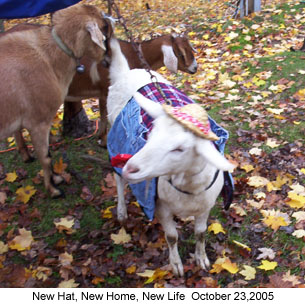
So your goat is a show going goat. Your goat is headed to a 4H event. You notice on the show bill that there will be a class called Costume Class...and your guy needs an outfit. Or, your goat has a trick gig or is visiting a school, church or old folks home and you want to dress it up.
There are so many ideas! You goat can dress like another animal (horse, dog, cow, ect), like a character out of a cartoon or history, can become an object like a beach ball or hotdog, or your goat can dress to match the outfit you will be wearing outfit.
It might be best to use a goat coat (see the above goat coat ideas) for your base of the costume. You can decorate it with trim and ribbons and balloons or you can make it into the base for a fabric saddle and horse type/print blanket.
If your goat does not have horns, hats are cute and fun and easy to add to the goat's costume. A child sized baseball cap with a chin strap for the goat made out of elastic is a riot to see a goat in. Check resale shops and garage sales for child sized hats and even man's T-Shirts can be tailored to fit a goat (picture and writing sides up on the back of the goat of course).
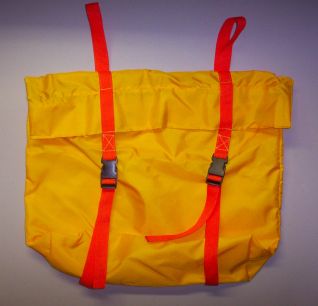
You can also use a daypack as the basis of your costume for your goat. Use as is or decorate it with fabrics, ribbons, fringe, or even bells and balloons. Add a hat and there you go! Using your day pack as your costume is also great for carrying items with you.
The possibilities are endless. Just be careful to make sure that your goat is in a well fitting outfit. You do not want the goat to trip on or steps out of the outfit as it walks. The better your outfit fits your animal the higher the score you will get in the class.
MAKING SAWBUCK SADDLES FOR YOUR GOATS
I remember before Deron and I started making our own goat sized Sawbuck Saddles, we looked EVERYWHERE for a pattern, on line, in books, asked goat packing people, we even and asked on all the goat elists....nothing, not one response!! It seemed to be a well kept secret. So, we just used our llamas Sawbuck Saddle as a pattern and brought the size down for the goats.
Three things that is very important when making your own Sawbuck Saddles,
ONE: A goat saddle will not fit all goats. Just because it fits a goat, dose not mean it will fit your goat. Just like a horse saddle, fit matters.
TWO: Watch your angles when putting together your saddle. Take it out to your goat (each goat) and try it on them before the final lock down on your saddle side boards as well as your X bars. Remember to keep your X bars high enough so that they will not touch the goats spine when loaded.
THREE: Padding matters. Carpet seem like a good idea, but remember, it offers very little padding to the goat, as compared to other options When carpet is wet, it will become more of a hindrance then a help, wet carpet will cause the pack to rub the goat. Closed Foam is a wonderful thing.
ALSO: (other important information on pack saddles for goats)
Make your saddle straps longer then you think you will need. This piece of equipment will out last many goats wearing it. So having the longer straps might come in handy for the next goat as far as size.
Don't cut your X pieces at the top too short. Some pannier straps will stay put better with more of an angle with a higher post then others.
You can paint or stain or just spray seal the wood on your pack saddle, but you should do one or the other. If left unfinished it will not last as long, you will not be able to clean it as well or as easily either. If it get stains on it, you will never get them out and they will be , or course, the type of stain you do not want.
Your Goat Sawbuck Saddle will outlast the now goat you are making/buying it for. So you may or may not want to paint or write your goat's name on the saddle it's self.
GOAT PACKS AND PANNIERS
If you make your own packing equipment be sure to really nail down your seams. Double stitching may not be enough. Packing trips can really be hard on some equipment with some goats. Some packs will be scrapped on trees, chewed at, gone through water crossings, and usual wear and tear. Keep in mind the wear that the type of pack/panniers will be receiving and build accordingly.
If you patch a pannier, cut your patch out of heavy duty fabric as close to matching the fabric as you can. I fold the fabric over for the patch. Sew it in place from the outside of the whole tucking your pannier (where the hole is) as you go so that the pannier will not fray further. You might need to clip your corners on the pannier for this. Sew it at least double then go right along the seam with a zig zag stitch. Now sew the inside of the patch (sew from the other side of the pack. Double your patch over where necessary and tuck it under so that it too does not fray. Sew it down close to the ends of the fabric. Zig Zag it too, this helps keep items from rubbing it when the goat walks with a load in it.
OR: You can buy a cute Embroidered Goat picture sew on patch, some goat clubs also sell patches that can be used, and sew it over the hole in your pannier. It is still best to repair the hole with the directions above then put the patch over the hole. Your work will last longer if done correct.
Don't think of your pannier as patched, think of it as broke in and has character! Patches on goat panniers are like scars on your body, a lot like a tattoo only with a better story!
GOAT AGILITY AND OBSTACLE COURSE ITEMS

You will have a good time making goat agility course or obstacle course equipment for your goat. You and your goats have a good time on/with the obstacles. Goat Agility and or Obstacle Courses are also great fun for spectators.
I have all kinds of ideas for building pieces of equipment on my Agility/Obstacle Course page here at this site. Please remember to keep your equipment safe and stable for the goat's weight.
MORE TO COME
| 


 In the high plains of South Dakota, USA